
Introduction to Homemade Twinkies
The Nostalgia of Snack Cakes
There's something undeniably magical about snack cakes, especially the iconic Twinkie. For many of us, these golden pastries symbolize carefree childhood days and sweet moments shared with friends. A quick bite or a packed school lunch evoked pure joy, didn't it? Whether it was the creamy filling or the soft sponge, each taste brought a wave of nostalgia that’s hard to replicate.
Fast forward to today, and it's time to relive those cherished memories with a twist: homemade Twinkies. These delightful treats not only embody the same flavors and textures we loved, but they also offer the opportunity to add a personal touch. The beauty of making your own is that you can experiment—think about adding flavors like lemon zest or even a hint of chocolate, if you’re feeling adventurous!
As a devoted fan of the original, I would never claim to outshine such an iconic snack. Still, these homemade Twinkies are undeniably delicious—perfect for impressing guests or simply satisfying a sweet tooth. Want to take a trip down memory lane? Let's dive into this nostalgic recipe and create sweet treats that bring a smile to everyone's face. Ready? Let’s go!
Ingredients for Homemade Twinkies
Making homemade Twinkies is a delightful adventure! Below, I’ll break down the essential ingredients you’ll need to create these nostalgic treats yourself.
Essential Ingredients for the Cake
To whip up the fluffy cake base, gather the following:
- ¾ cup + 2 tablespoons of all-purpose flour
- ¾ cup granulated sugar (divided)
- 1 teaspoon baking powder
- ½ teaspoon kosher salt
- 3 eggs, separated (at room temperature)
- ¼ cup mild flavored oil (vegetable or olive)
- ¼ cup fresh squeezed orange juice
- 1 teaspoon orange zest
- 1 teaspoon vanilla extract
- 2 additional egg whites (room temperature)
- ½ teaspoon cream of tartar
These simple, yet essential ingredients create that delightful texture Twinkies are known for.
Components for American Buttercream
Next up, the rich American Buttercream frosting! You’ll need:
- 1 ½ cups confectioners’ sugar
- 6 tablespoons unsalted butter (at room temperature)
- ½ tablespoon vanilla extract
- ¼ teaspoon almond extract
- Pinch of kosher salt
- 1 to 2 tablespoons heavy whipping cream
This velvety frosting is what truly makes your homemade Twinkies adorable and delicious. For tips on how to get the perfect frosting consistency, check out resources from Wilton or Serious Eats.
Gather these ingredients, and you’re ready to embark on a delightful baking journey that would impress anyone!
Preparing Homemade Twinkies
Creating homemade Twinkies is a delightful journey that begins in your kitchen, where the sweet familiar flavors of our childhood await. Follow these steps to whip up your own batch of delicious cakes that are sure to impress friends and family alike!
Preheat and prepare your baking pan
Start by preheating your oven to 350°F (175°C). While your oven warms up, take your nonstick hot dog bun pan and give it a light greasing. This step is crucial to ensure that those little cakes slide right out when it’s time to indulge. Plus, a well-prepared pan will make your life easier during cleanup!
Mix the dry ingredients
In a large bowl, whisk together the flour, ½ cup (100g) of granulated sugar, baking powder, and kosher salt until they’re well combined. This mixture is the foundation of your homemade Twinkies, so take your time to ensure there are no lumps. If you're interested in more tips for baking perfection, check out the King Arthur Baking Company.
Combine the wet ingredients
In a separate bowl, stir together the egg yolks, oil, fresh squeezed orange juice, orange zest, and vanilla extract. This vibrant mixture adds a delightful flavor zing to your cakes. Once combined, add the dry ingredients to the wet mix and whisk until smooth. It’s starting to come together!
Create the meringue
Now for the magic component! In a stand mixer fitted with the whisk attachment, combine the egg whites and cream of tartar. Beat on high speed for about 2 minutes, until medium peaks form, which will give your homemade Twinkies that light, airy texture everyone loves. Gradually sprinkle in the remaining sugar and continue beating until you achieve stiff, glossy peaks. This step is where your patience pays off!
Fold it all together
Once your meringue is ready, gently stir one-third of it into the egg yolk mixture. This action helps to lighten the yolk mixture. Then, carefully fold in the remaining meringue using either the whisk attachment or a rubber spatula. Be gentle here—over-mixing can deflate the airiness you just worked so hard to create.
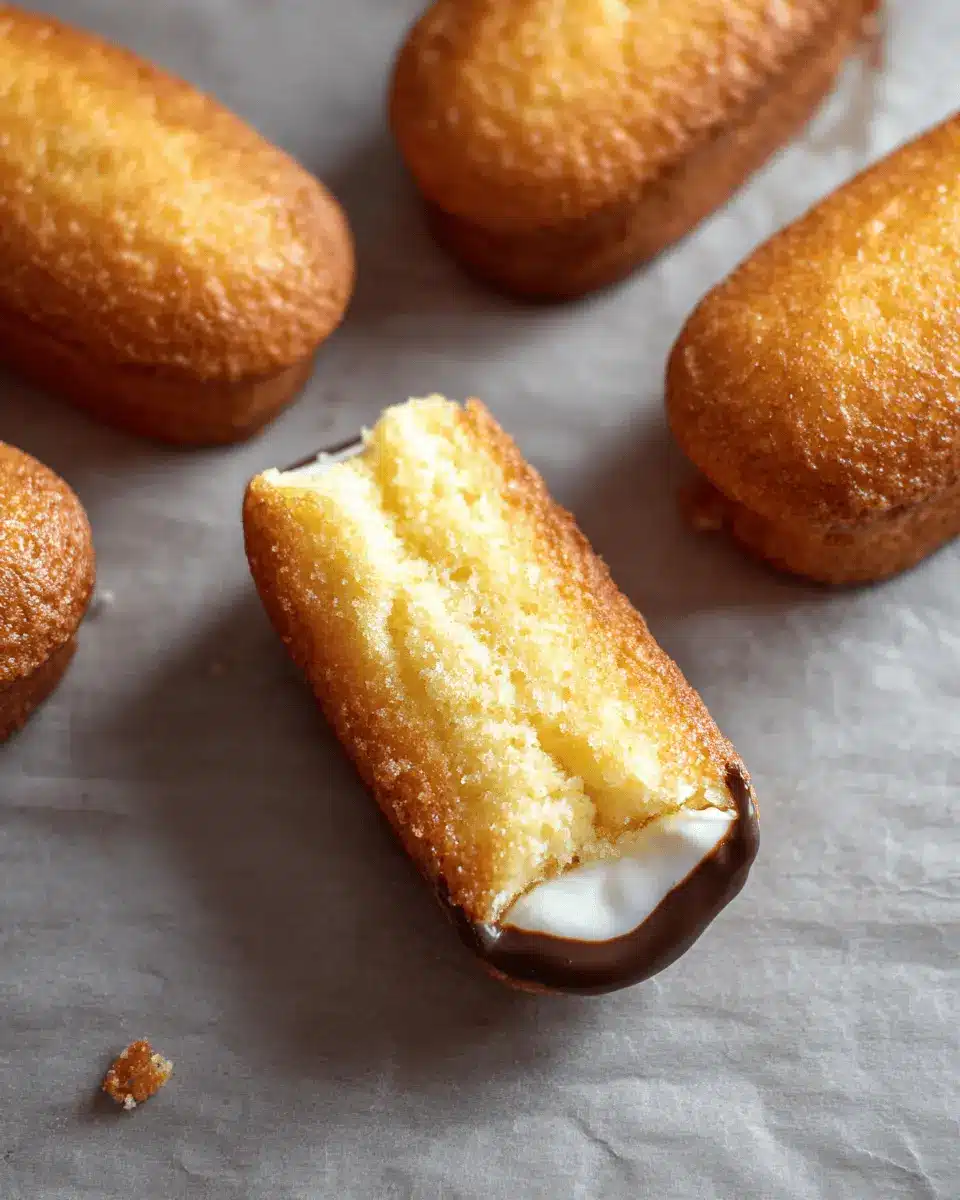
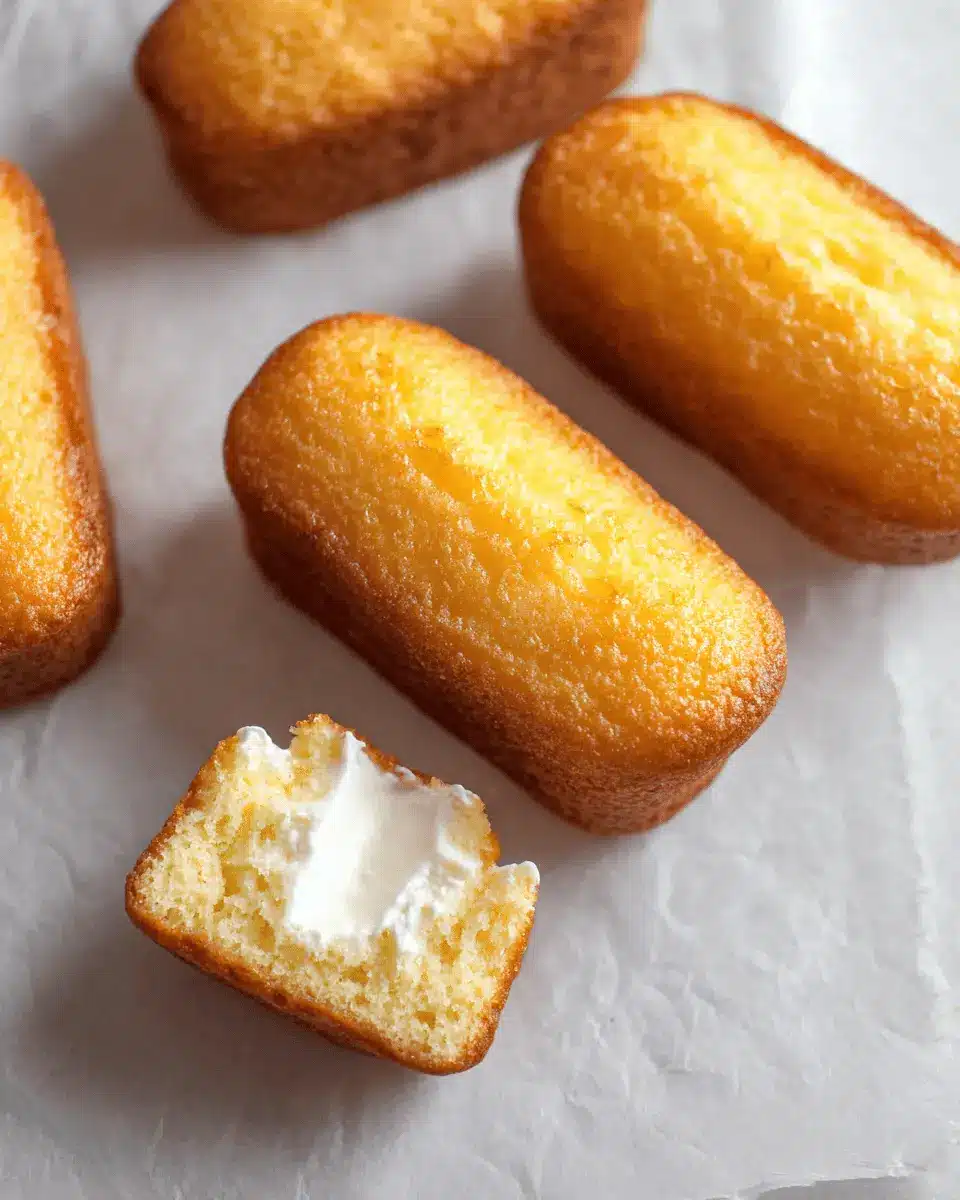
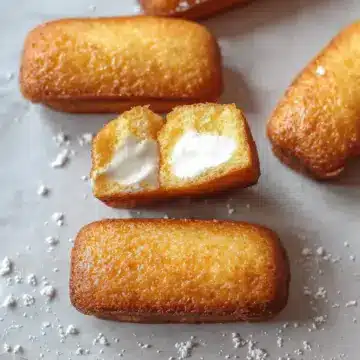
Pipe into the pan and bake
Fit a 16-inch pastry bag with a large round tip and fill it with the cake batter. Pipe into the prepared pan, filling each mold about two-thirds full. Bake those beauties for 15 to 20 minutes, or until they turn golden brown and a toothpick comes out clean. Once they've cooled slightly in the pan, invert it gently and tap to remove the cakes. Now, let them cool completely on a sheet of parchment paper before assembling with your favorite frosting.
Embrace the joy of making these homemade Twinkies—the soft sponge, creamy filling, and nostalgic flavor are certain to become a cherished recipe in your kitchen!
Variations on Homemade Twinkies
If you’re ready to indulge your sweet tooth, these fun variations on homemade Twinkies will take your baking game to the next level!
Chocolate-filled Twinkies
Imagine biting into a soft sponge cake, only to be greeted by a rich, creamy chocolate filling. To create chocolate-filled Twinkies, swap the vanilla in your American buttercream with cocoa powder. You can also use a chocolate ganache or even a decadent Nutella filling for a luxurious treat. This twist is perfect for cocoa lovers looking for a satisfying dessert experience. For more inspiration, check out Serious Eats for similar chocolate recipes.
Lemon zest Twinkies
For a refreshing citrus flavor, try adding fresh lemon zest to your cake batter along with a splash of lemon juice. This will brighten up the flavor profile, making your homemade Twinkies perfect for summer gatherings or tea parties. Pair your lemon cakes with a light lemon buttercream for an extra zing that will have everyone asking for seconds! If you're curious about more culinary techniques, visit Epicurious for tips.
Baking notes for Homemade Twinkies
Tips on perfecting your cake texture
To achieve the ideal texture for your homemade Twinkies, focus on the balance of ingredients and the folding technique. Be gentle when incorporating the egg whites; overmixing can deflate the airy meringue. Aim for a light, fluffy batter that's not too dense. Using room temperature eggs can also enhance the cake's rise!
Frosting tips for best results
For the best frosting experience, ensure your butter is at room temperature to achieve a creamy consistency. Gradually add heavy cream to get the spreadable texture just right. And don't forget, a pinch of salt enhances the sweetness beautifully!
For more tips on cake baking, check out Joy of Baking’s tips on egg temperatures or Serious Eats’ guide to frosting techniques.
These helpful pointers will elevate your homemade Twinkies to a whole new level!

Serving suggestions for Homemade Twinkies
Pairing with Coffee or Tea
Imagine sinking your teeth into a fluffy Homemade Twinkie while sipping your morning coffee or an afternoon cup of tea. The creamy filling pairs beautifully with a rich espresso or a refreshing herbal tea, creating a delightful contrast of flavors. For a fun twist, try pairing your Twinkies with lavender or chamomile tea for a soothing afternoon treat. Not only do these beverages enhance the eating experience, but they also elevate your snack moment into a mini celebration.
Using as a Party Dessert
Looking to impress at your next gathering? Serve Homemade Twinkies as a nostalgic yet sophisticated dessert! Arrange them on a beautiful platter, perhaps dusted with powdered sugar or drizzled with chocolate sauce for that extra touch of elegance. These delightful cakes are perfect finger foods, making them easy to enjoy without any fuss. You could even get creative and combine them with a fruit or vanilla ice cream for a unique dessert bar. Your guests will rave about this sweet treat, and you’ll be the toast of the party!
For more creative serving ideas, check out resources like Food52 for inspiration on how to make your gatherings memorable.
Tips for Making Perfect Homemade Twinkies
Common Pitfalls to Avoid
Creating homemade Twinkies can be a delightful adventure, but there are few common missteps to dodge. First, be cautious not to overmix your batter; this can lead to dense cakes instead of the light, airy texture we're aiming for. Additionally, ensure your meringue achieves stiff peaks—this is crucial for that classic Twinkie fluffiness. Lastly, don’t skip the cooling step after baking; it allows the cakes to firm up, making them easier to handle.
Importance of Ingredient Temperature
The temperature of your ingredients plays a significant role in achieving the best results. For your eggs, ensure they’re at room temperature as this helps create a more stable meringue and ultimately a fluffier cake. Similarly, using butter that's slightly softened rather than cold will help your frosting blend smoothly, enhancing both flavor and texture. So, give your ingredients a little time to warm up for truly homemade Twinkies that impress!
For more baking tips, check out credible sources like King Arthur Baking for their insights on ingredient temperatures and handling.
Time Details for Homemade Twinkies
Preparation Time
Get ready to whip up these delightful homemade Twinkies in about 20 minutes. This time includes gathering your ingredients and mixing everything together until smooth.
Baking Time
You'll want to dedicate 15 to 20 minutes for baking. Keep an eye on them as they turn golden and start smelling irresistible.
Total Time
In all, the total time needed to enjoy your delicious homemade Twinkies is around 40 to 45 minutes, not including cooling time and frosting! Isn’t that a sweet deal for such a delectable treat? If you'd like more details on timings for other baking recipes, check out this baking timer guide.
Feel free to invite friends over to share these beauties once they’re cooled and frosted; they're sure to impress!
Nutritional Information for Homemade Twinkies
Calories per Serving
Each homemade Twinkie contains approximately 180 calories. This makes for a delightful treat that’s a bit lighter than the store-bought version, allowing you to indulge without too much guilt.
Suggested Dietary Considerations
These homemade treats are perfect for sharing! If you're conscious about dietary restrictions, consider the following:
- Egg Allergies: You can experiment with egg substitutes.
- Gluten-Free Options: Try using a gluten-free flour blend.
- Sugar Alternatives: Replace granulated sugar with your favorite sweeteners for a lower-calorie version.
For more information on healthy baking practices, you can visit Healthline. Enjoy your baking!
FAQs about Homemade Twinkies
Can I make these Twinkies gluten-free?
Absolutely! To create gluten-free homemade Twinkies, simply substitute all-purpose flour with a high-quality gluten-free blend. Many commercial blends, like those from Bob's Red Mill or King Arthur, work wonders. Make sure to check that any other ingredients, like baking powder, are also gluten-free. Your snack cakes can still be deliciously fluffy and moist!
How do I store the homemade Twinkies?
To keep your homemade Twinkies fresh, simply store them in an airtight container at room temperature for up to 24 hours. If you're looking to prolong their shelf life, refrigerating them is a good idea, but allow them to come to room temperature before enjoying. This way, you won’t lose any of that delightful texture.
Can I freeze them for later?
Definitely! Freezing your homemade Twinkies is a smart way to save them for a sweet treat later. Wrap each cake individually in plastic wrap and place them in a resealable freezer bag. They’ll keep in the freezer for up to 2 months. Just remember to thaw them in the fridge overnight or at room temperature for a couple of hours before devouring!
For more tips on freezing baked goods, check out King Arthur Baking.
Conclusion on Homemade Twinkies
Enjoying your homemade treat
Creating your own homemade Twinkies is not only a fun baking adventure but also a delightful way to indulge your sweet tooth without all the preservatives. Serve them fresh or share with friends; these cakes are bound to bring back nostalgia! For more dessert inspiration, check out Zoë Bakes for delectable ideas!
Homemade Twinkies
Equipment
- Stand Mixer
- Hot Dog Bun Pan
Ingredients
Cake Ingredients
- ¾ cup all-purpose flour
- ¾ cup granulated sugar divided
- 1 teaspoon baking powder
- ½ teaspoon kosher salt
- 3 whole eggs separated, at room temperature
- ¼ cup mild flavored oil such as vegetable
- ¼ cup fresh squeezed orange juice
- 1 teaspoon orange zest
- 1 teaspoon vanilla extract
- ½ teaspoon cream of tartar
American Buttercream
- 1 ½ cups confectioners’ sugar
- 6 tablespoon unsalted butter at room temperature
- ½ tablespoon vanilla extract
- ¼ teaspoon almond extract
- pinch kosher salt
- 1-2 tablespoon heavy whipping cream 15 to 30 ml
Instructions
Cake Preparation
- Preheat oven to 350°F / 175°C. Lightly grease a nonstick hot dog-bun pan.
- In a large bowl, whisk together the flour, ½ cup / 100g of the sugar, baking powder, and salt until combined. Set aside.
- In a separate bowl, stir together the egg yolks, oil, orange juice, orange zest, and vanilla.
- Add the dry ingredients to the egg yolk mixture and whisk together until smooth. Set aside.
- In a stand mixer fitted with the whisk attachment, combine the egg whites (5 total) and cream of tartar and beat on high speed until medium peaks form, about 2 minutes.
- Turn the speed to medium-low and slowly sprinkle the remaining ¼ cup / 50g sugar to create a French meringue. Turn the speed to high and beat until stiff, glossy peaks form, 1 to 2 minutes more.
- Stir ⅓ of the meringue mixture into the egg yolk mixture to loosen it up. Then, fold the remaining meringue into the yolk mixture.
- Fit a 16-inch / 40cm pastry bag with a large round tip (Ateco #9807), pour the batter into the bag, and then pipe into the prepared pan, filling each mold only ⅔ full.
- Bake until golden and a tester comes out clean, 15 to 20 minutes. Invert the pan and tap gently to remove the cakes onto a sheet of parchment paper. Let cool completely.
American Buttercream Preparation
- In a stand mixer fitted with the paddle attachment, combine the confectioners’ sugar and butter and beat on low speed until combined.
- Turn the mixer speed to medium and beat until a thick paste forms. Scrape down the bowl and paddle, then add the vanilla, almond extract and salt and beat for a few seconds more.
- With the mixer on low speed, add enough of the cream, a little at a time, to make the frosting spreadable. Use immediately.
Assembly
- Fit a 12-inch/30-cm pastry bag with a Bismark piping tip (Ateco #230) and fill with the frosting. Inject the frosting from the bottom of each cake by poking the tip into it about ¾ of the way through—fill until the cake begins to bulge. Repeat injecting the frosting every ½ inch / 1.3 cm.
- Serve the cake immediately or store in the refrigerator, covered, up to 24 hours. If refrigerated, bring the cake to room temperature before serving.
Leave a Reply