
Why a Classic Patty Melt Deserves a Spot in Your Kitchen
If you’ve never experienced the joy of a classic patty melt, let me be the first to say you’re in for a treat. This timeless sandwich merges the heartiness of a burger with the elegance of a grilled cheese. The combination of juicy beef patties nestled between layers of melty cheese and caramelized onions, all encased in buttery rye bread, brings unparalleled comfort.
With just a handful of ingredients and a total prep and cook time of only 30 minutes, the patty melt is perfect for a weeknight dinner or a cozy weekend lunch. According to The History Channel, this delightful dish has a rich history, often enjoyed in diners across America.
Making a classic patty melt allows you to customize it however you'd like, whether with extra toppings like sliced pickles or opting for turkey bacon for a different spin. Plus, cooking at home means you control the ingredients, ensuring freshness and quality. So, why not swap takeout for this delicious comfort food? Your taste buds (and wallet) will thank you!
Ingredients for Your Classic Patty Melt
Essential ingredients for a delicious patty melt
Making a classic patty melt starts with some essential ingredients that combine to create that irresistible flavor and texture:
- Ground beef: Aim for a good quality beef with a fat content around 80/20 for juiciness.
- Salt and pepper: Simple seasoning that enhances the beef’s natural flavors.
- Butter: For the perfect golden crust on your bread.
- Onion: Sweet, caramelized onions add depth and sweetness.
- Rye bread: A traditional choice that complements the beef beautifully.
- Cheddar cheese: Sharp Cheddar is a must for that melty, creamy goodness.
Optional ingredients that can elevate your melt
While the essentials create a solid foundation, adding a few optional ingredients can take your patty melt to the next level:
- Turkey bacon: A crispy layer that adds a delightful crunch.
- Pickles: Slices of dill pickles can introduce a tangy flavor that contrasts nicely with the richness of the cheese.
- Spicy mustard: A spread can add a flavorful kick.
- Sautéed mushrooms: For those who enjoy an earthy twist.
These additions not only enhance taste but also showcase your creativity. Whether you're staying classic or experimenting, the choice is yours! For tips on selecting the best beef or enhancing your melt experience, check out resources like The Beef Checkoff or Taste of Home.
Step-by-Step Preparation of Classic Patty Melt
Preparing a classic patty melt is a delicious adventure that transforms simple ingredients into a mouthwatering meal. Follow these easy steps to make your cooking experience enjoyable.
Gather Your Ingredients
Before diving into the cooking process, it’s essential to have everything on hand. For a classic patty melt, you’ll need:
- 1 pound of ground beef
- ½ teaspoon of salt
- ¼ teaspoon of ground black pepper
- 2 tablespoons of butter
- 1 large onion, sliced
- 6 teaspoons of mayonnaise
- 6 slices of rye bread
- 6 slices of sharp Cheddar cheese
Having your ingredients ready will make the process smoother and more enjoyable. Check out The Kitchn for some tips on picking quality ground beef!
Seasoning and Shaping the Patties
Once your ingredients are laid out, season the ground beef with salt and pepper. Next, divide the beef into three equal portions, shaping each into a patty. For optimal cooking, make a slight indentation in the center of each patty with your thumb. This technique ensures that your patties cook evenly and stay flat.
Sautéing Onions to Perfection
In a skillet over medium heat, melt the butter. Add the sliced onion and sauté until they become soft and translucent, about 5 to 7 minutes. The goal here is to elevate those onions from mere toppings to a flavor powerhouse in your classic patty melt. Once done, transfer the onions to a bowl and set them aside. If you want to kick up the sweetness, consider adding a splash of balsamic vinegar during sautéing!
Cooking the Patties
Using the same skillet, place your beautifully shaped patties in the leftover butter and onion flavors. Cook them for about 3 to 5 minutes per side, adjusting the time based on your desired doneness level. Remember, cooking them in the skillet where the onions were adds an extra depth of flavor that elevates the whole dish.
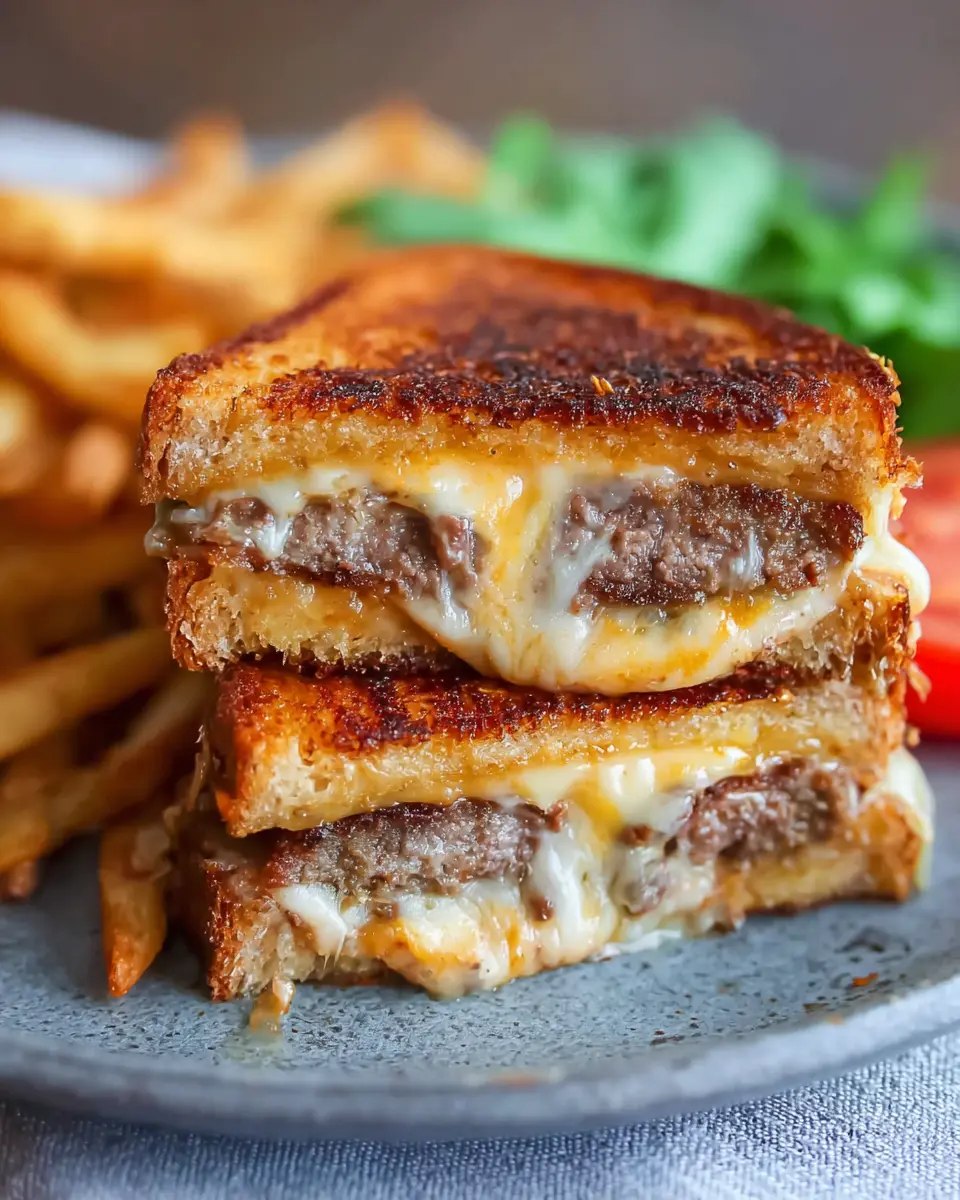
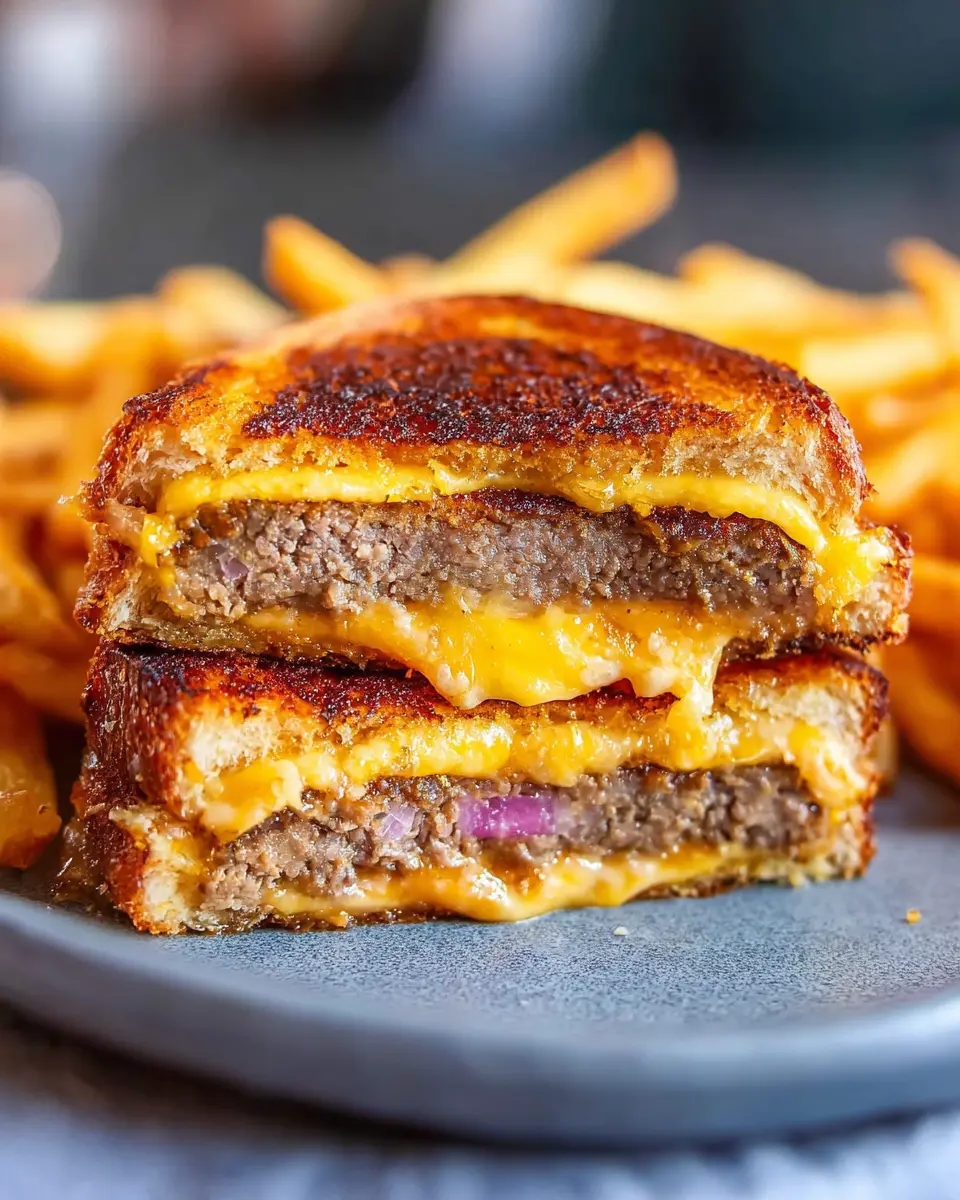
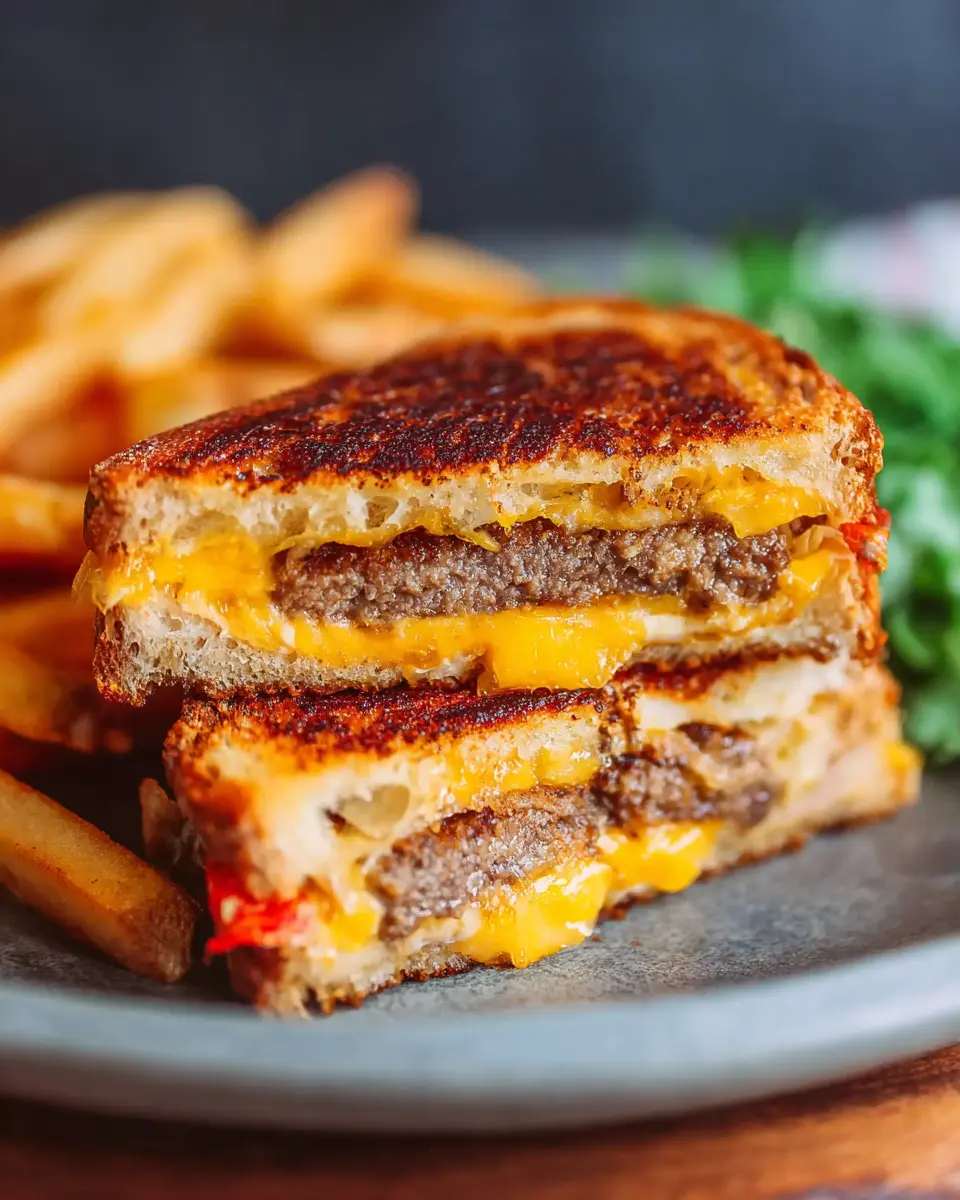
Assembling the Patty Melt
With the patties perfectly cooked, it’s time to assemble. Spread 1 teaspoon of mayonnaise on one side of each slice of rye bread. In the skillet, place three slices of bread, mayonnaise-side down. Layer on one slice of cheese, a beef patty, one-third of the sautéed onions, another slice of cheese, and finish with a second slice of bread, this time mayonnaise-side up.
Crispy, Golden Finish
Now, it’s time for the magic to happen! Cook the sandwich until the bread turns golden brown and the cheese starts to melt, about 3 to 4 minutes. Carefully flip each sandwich over and cook for an additional 3 to 4 minutes. The result? A classic patty melt that’s crispy on the outside and gooey on the inside.
Enjoy your classic patty melt with a side of crispy fries or a fresh salad for a well-rounded meal that’s sure to satisfy! For more delicious recipes, don’t forget to check out Serious Eats for inspiration!
Variations on the Classic Patty Melt
Veggie-packed patty melt
If you’re looking to lighten up your classic patty melt, consider swapping in a vegetarian patty. Combine black beans or chickpeas with spices, and add plenty of sautéed veggies like bell peppers and spinach. You can also experiment with flavors by including cheese alternatives or a spread of hummus to give each bite a creamy texture. Not only will you enjoy a delicious sandwich, but you’ll also be incorporating more nutrients into your meal!
Turkey bacon twist on the classic
For a savory twist, try adding turkey bacon to your classic patty melt! Cook it until crispy, then layer it on top of your beef patty along with the cheese and onions for an extra crunch. The slightly smoky flavor of turkey bacon takes your patty melt to a whole new level. Pair it with a refreshing side salad or sweet potato fries for a complete meal. Interested in a flavor boost? Check out this blog post on bacon alternatives for more ideas!
Cooking Tips and Notes for the Classic Patty Melt
How to achieve the perfect melt
To create the ultimate classic patty melt, focus on achieving that wonderful cheese melt. Using a combination of sharp cheddar and a melty cheese like American can elevate your sandwich. Covering the skillet with a lid while cooking can help trap heat, ensuring the cheese fully melts without burning the bread.
Avoiding common mistakes
A few common pitfalls can ruin your patty melt experience. Avoid pressing down on the patties while they cook; this squeezes out precious juices. Also, using too much heat can burn your bread before the cheese melts. A medium-low heat ensures everything cooks evenly, resulting in a deliciously satisfying melt. For more tips, check out the American Cheese Society for insights on cheese selection!
Serving Suggestions for Classic Patty Melt
The Best Sides to Pair with Your Melt
When enjoying a classic patty melt, the right side dishes can elevate your meal. Consider pairing your melt with:
- Crispy Sweet Potato Fries: They add a sweet contrast to the savory flavors.
- Coleslaw: This crunchy side brings a refreshing bite that complements the richness.
- Pickles: Their tanginess cuts through the cheese and beef beautifully.
You could also explore food pairing tips for more inspiration!
Creative Dipping Sauces
Why settle for plain condiments? Spice up your classic patty melt experience with some delightful dipping sauces:
- Garlic Aioli: A creamy addition that enhances every bite.
- Spicy Mustard: This packs a punch and adds a bit of zest.
- Sriracha Ketchup: The perfect balance of sweet, spicy, and savory.
These sauces not only diversify flavors but also make each bite an adventure!
Time Breakdown for Classic Patty Melt
Preparation time
To get started on your classic patty melt, set aside just 10 minutes for preparation. This includes seasoning your beef and slicing those delicious onions. It's a quick process that allows you to gather everything you need in a breeze.
Cooking time
The cooking phase will take about 20 minutes. You'll be actively grilling the patties and toasting the bread, making your kitchen smell fantastic while you wait for that cheesy goodness to melt.
Total time
In just 30 minutes, you can have a hearty classic patty melt ready to devour. Perfect for a busy weeknight dinner or a relaxed weekend treat! For more tips on timing, check out this engaging article on meal prep to help you be even more efficient.
Nutritional Facts for Classic Patty Melt
When indulging in a classic patty melt, it’s good to know what you’re savoring. Here’s a quick peek at the nutritional facts:
Calories
Each delightful serving of the classic patty melt packs about 822 calories. While it’s a hearty meal, enjoy it in moderation to balance your overall daily intake.
Protein
With approximately 46 grams of protein, this melt isn’t just delicious; it’s also a fantastic source of nutrition! Perfect for fueling your busy day.
Sodium
Keep in mind, the sodium content is around 1358 mg. If you’re watching your salt intake, consider pairing it with a refreshing side salad to balance things out.
For more detailed nutrition guidance, check resources from the USDA or Nutrition.gov that can help you understand your daily value needs better. Enjoy your cooking adventure!
FAQs about Classic Patty Melt
What type of bread is best for a patty melt?
When it comes to enjoying a classic patty melt, the bread choice is crucial for that perfect crunch and flavor. While Jewish rye is a popular choice, any rye bread—including marble or pumpernickel—will work beautifully. The key is to find a bread that holds up during cooking while complementing the beef and cheese.
Can I customize the cheese for my melt?
Absolutely! While sharp Cheddar cheese is a staple in a classic patty melt, feel free to get creative. Consider using Swiss, American, or even pepper jack for an extra kick. Mixing different cheeses can also result in a flavorful and gooey filling that elevates your patty melt!
How do I store leftovers?
If you're lucky enough to have leftovers after making your patty melts, here’s how to store them properly. Allow the sandwiches to cool, then wrap them tightly in plastic wrap or aluminum foil. For the best taste, store them in the refrigerator for up to three days. Reheat in a skillet for that fresh-off-the-grill taste! For more tips on food storage, check out FoodSafety.gov.
Conclusion: Enjoying Your Classic Patty Melt
Embracing the Joy of Homemade Comfort Food
As you dive into your classic patty melt, take a moment to relish in the simplicity and satisfaction of homemade comfort food. This recipe doesn’t just fill your stomach; it warms your heart, reminding you of lazy Sundays or cozy evenings with friends. Serve it with a side of crispy fries or a fresh salad for a complete experience. So grab a plate, grab a friend, and enjoy the deliciousness of your creation! For more tips on cooking and enjoying comfort food, you might want to check out The Kitchn’s guide to grilling.

Classic Patty Melt
Equipment
- skillet
Ingredients
- 1 pound ground beef
- ½ teaspoon salt
- ¼ teaspoon ground black pepper
- 2 tablespoons butter
- 1 large onion, sliced
- 6 teaspoons mayonnaise
- 6 slices rye bread
- 6 slices sharp Cheddar cheese
Instructions
- Season ground beef with salt and pepper; divide into 3 equal-sized balls. Shape each ball as close as possible to the shape of the bread. Make an indentation in the center of each patty with your thumb to help keep them flat while cooking.
- Melt butter in a skillet over medium heat. Add onion; cook and stir until soft and translucent, 5 to 7 minutes. Transfer onions into a bowl and set aside. Place beef patties into the same skillet and cook until desired doneness, 3 to 5 minutes per side.
- Meanwhile, spread 1 teaspoon of mayonnaise on one side of each slice of bread.
- Place 3 slices bread mayonnaise-side down in the skillet. Top each with 1 slice of cheese, 1 beef patty, ⅓ of the onions, a second slice of cheese, and another slice of bread, mayonnaise-side up. Cook bread until golden brown and cheese has started to melt, 3 to 4 minutes. Flip each sandwich over and cook an additional 3 to 4 minutes.


Leave a Reply