
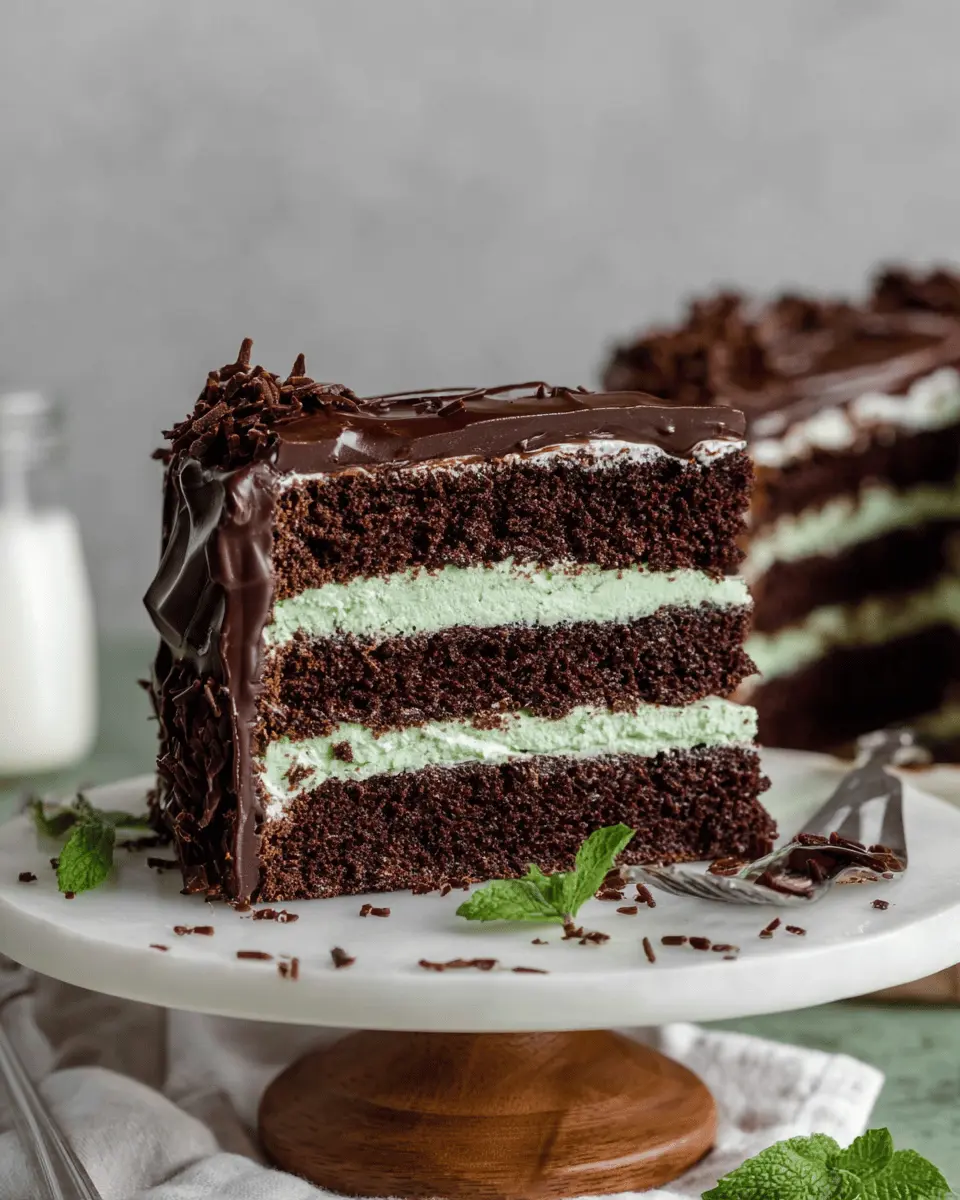
Introduction to Andes Chocolate Mint Cake
If you're a young professional craving a sweet escape after a long workday, the Andes Chocolate Mint Cake is your new best friend. Imagine biting into a rich chocolate layer adorned with smooth, minty goodness that transports you to your favorite ice cream parlor. This cake perfectly captures the essence of mint chocolate chip ice cream, making it ideal for dinner parties, celebrations, or simply treating yourself on a quiet evening at home.
What makes this cake a must-try for young professionals? For starters, its impressive layers and vibrant mint chocolate frosting guarantee you will wow your friends and colleagues alike. The taste is delightfully nostalgic, reminding many of childhood treats and carefree evenings. Plus, it’s a great excuse to take a break from working hard and indulge in some much-deserved self-care.
Not only is it delicious, but the Andes Chocolate Mint Cake also doubles as a fun baking project. It invites you to savor the process of mixing, baking, and decorating—an enjoyable way to unwind after a busy week. So, grab your apron and let's dive into the recipe! You can also explore more dessert ideas on sites like Food Network or Bakerella for some inspiration on sweet treats.
Ingredients for Andes Chocolate Mint Cake
Creating the perfect Andes Chocolate Mint Cake can be both a delightful and rewarding experience! Let’s break down the essential components you'll need to whip up this delicious minty treat.
Essential components for the chocolate cake
To create the inviting base of your Andes Chocolate Mint Cake, gather the following ingredients:
- 2 ½ cups All-purpose flour
- 1 cup Dutch process cocoa powder
- 1 ¾ cups White granulated sugar
- 2 ½ tsp Baking powder
- 1 ½ tsp Baking soda
- 1 tsp Salt
- ¾ cup Canola or vegetable oil
- 2 tsp Pure vanilla extract
- 4 Large eggs (room temperature)
- 1 ¼ cups Buttermilk (room temperature)
- 1 cup Hot water
These ingredients combine to create a moist and flavorful chocolate cake that mimics the taste of mint chocolate chip ice cream. Learn more about what each ingredient contributes to your cake from King Arthur Baking.
Key ingredients for the frosting
The delicious mint chocolate chip frosting is what makes this cake stand out! For the ideal frosting, you’ll need:
- 2 ½ cups Unsalted butter (slightly cold)
- 7 ½ cups Powdered sugar
- 1 tsp Peppermint extract
- 1 tsp Pure vanilla extract
- ½ tsp Salt
- ½ cup Heavy cream
- Food dye (blue, green, brown)
- 4 oz Semisweet chocolate bar (chopped into small pieces)
- 2 Packages of Andes Mints (40 bars for filling, rest for decoration)
These ingredients work harmoniously to create a fluffy, minty frosting that complements the chocolate layers beautifully. Looking for more frosting tips? Check out Frosting Tips & Tricks for expert advice!
With these essential ingredients, you're well on your way to making a show-stopping Andes Chocolate Mint Cake. Happy baking!
Preparing Andes Chocolate Mint Cake
Making an Andes Chocolate Mint Cake is a delightful journey, combining rich chocolate and refreshing mint flavors reminiscent of mint chocolate chip ice cream! Here’s how to make this irresistible layered cake that will impress your friends and family.
Preheat and Prepare Your Cake Pans
Start by preheating your oven to 350°F. Grease three 8-inch round cake pans with non-stick baking spray. For added assurance that your cake layers come out perfectly, line the bottoms of the pans with 8-inch parchment circles and spray again. This simple step ensures a smooth release—no one likes a broken cake!
Mix Dry Ingredients for the Cake
In a large mixing bowl, sift together 2 ½ cups of all-purpose flour, 1 cup of Dutch process cocoa powder, 1 ¾ cups of white granulated sugar, 2 ½ teaspoons of baking powder, 1 ½ teaspoons of baking soda, and 1 teaspoon of salt. This blend is essential for a light and fluffy cake. It’s a good idea to whisk the dry ingredients thoroughly, as this aerates the mixture and helps your cake rise beautifully.
Combine Wet Ingredients and Create the Batter
In a separate bowl, start heating 1 cup of water on the stove until it’s steaming, but not boiling. Now, whisk together ¾ cup canola oil, 2 teaspoons of pure vanilla extract, 1 ¼ cups of room-temperature buttermilk, and 4 large eggs until well combined. Slowly whisk in the hot water—be cautious, as the mixture will be warm. Pour these wet ingredients into the dry mix, stirring until just combined. Overmixing can lead to a denser cake, so gentle is the name of the game!
Bake the Cake Layers to Perfection
Evenly divide your batter between the three prepared cake pans. Bake in your preheated oven for 24-27 minutes, or until a toothpick inserted in the center comes out with moist crumbs. Once baked, allow the cakes to cool in their pans for about 10 minutes before transferring them to a cooling rack to cool completely.
Create the Mint Chocolate Chip Frosting
While the cake layers cool, it’s time to whip up that indulgent frosting. Start with 2 ½ cups of slightly cold unsalted butter. Beat it on high until fluffy—about 3 minutes. Gradually add 7 ½ cups of sifted powdered sugar. The mixture will be thick, so pace yourself! Incorporate 1 teaspoon of peppermint extract, 1 teaspoon of vanilla extract, ½ teaspoon of salt, and ½ cup of heavy cream. Beat on low until combined, then switch to high for about two minutes. The goal is a fluffy frosting that’s perfect for layering and decorating.
Assemble the Cake with Layers and Frosting
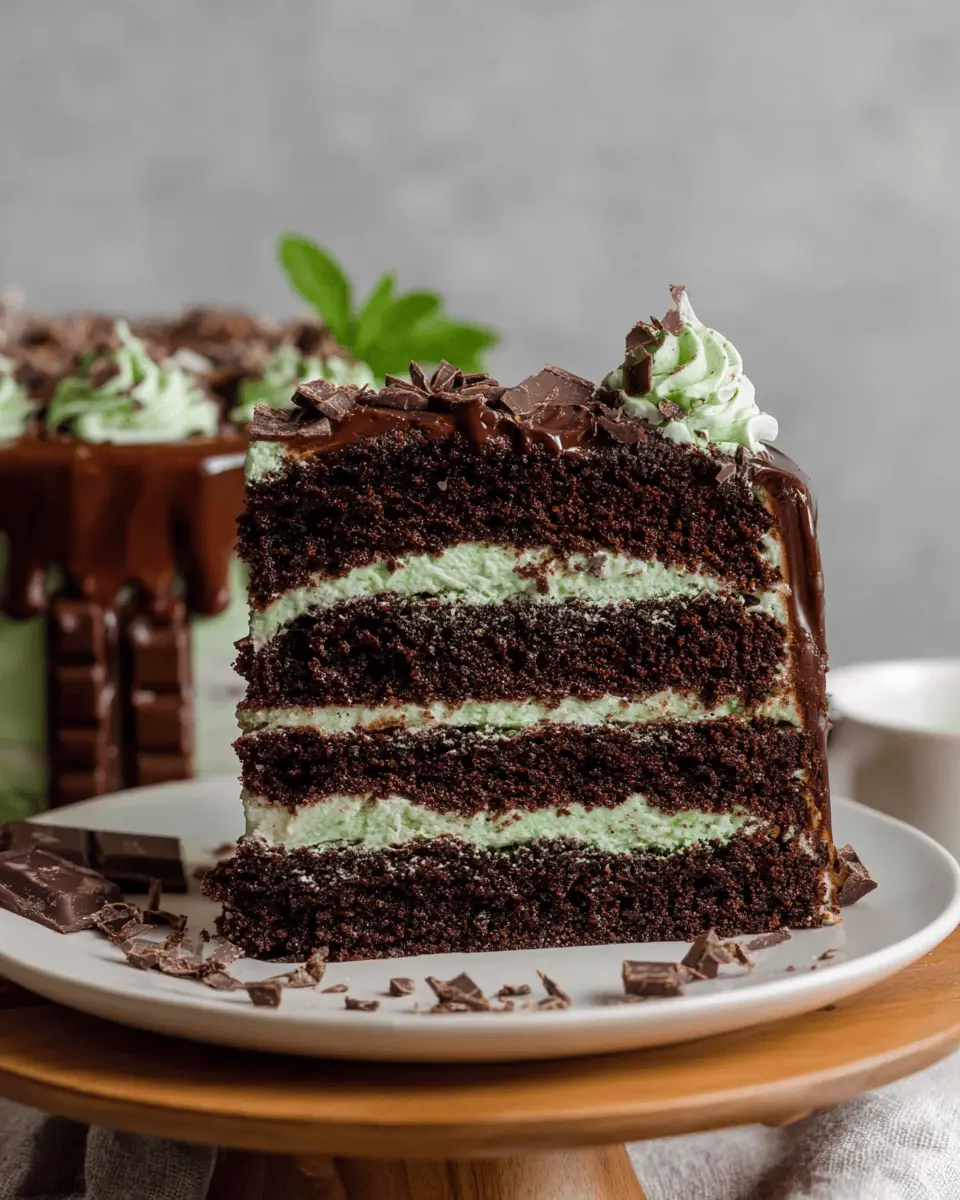
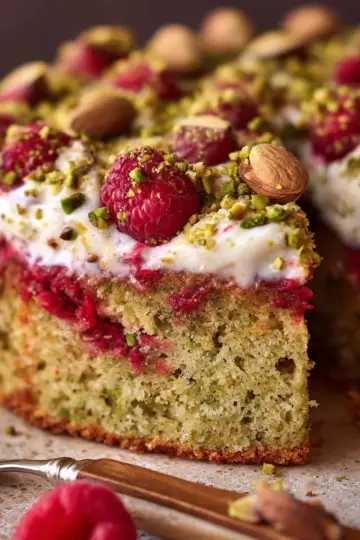
Now comes the fun part! If your cakes have domed tops, level them with a serrated knife. Chilling the layers in the freezer for about 15 minutes can help minimize crumbs while frosting. Begin the assembly by placing a dollop of frosting on your serving board to help secure the first cake layer. Add 1 cup of frosting, smoothing it evenly. Pipe a border around the edges, and sprinkle half of your chopped Andes mints. Repeat this for the second layer, then finish with the last cake layer upside down for an even top. Frost the entire cake with a light layer, freeze briefly if needed, then add a final layer of frosting to achieve a smooth finish.
As you top it all off with more chopped Andes mints, remember that a beautiful cake is a celebration of flavors and creativity! Your Andes Chocolate Mint Cake is ready for its grand debut—slice, serve, and enjoy!
For more cake decorating tips, check out this guide on Food Network!

Variations on Andes Chocolate Mint Cake
Adding a twist with different mint chocolates
If you want to take your Andes Chocolate Mint Cake to the next level, consider experimenting with other mint chocolates! You could swap out the classic Andes mints for peppermint patties or even mint chocolate truffles. Each variety brings its unique flavor profile and texture, allowing you to customize your cake for every occasion. For a kick of fun, try adding some crushed peppermint candies on top for a festive touch!
Experimenting with flavored frosting
While mint chocolate chip frosting is irresistible, don’t hesitate to try other frosting flavors that complement the chocolate base. For instance, a rich cream cheese frosting can add a tangy balance to the sweetness, making each bite delightful. Alternatively, a mocha frosting infused with coffee might offer a sophisticated twist that coffee lovers will adore. Who said you can only stick to one flavor? Mixing and matching can create a truly unique Andes Chocolate Mint Cake that matches your personal style!
Are you ready to create your very own variations? The possibilities are endless!
Baking notes for Andes Chocolate Mint Cake
Tips for perfecting your cake texture
Achieving the ideal texture for your Andes Chocolate Mint Cake begins with the basics. Ensure your ingredients, especially eggs and buttermilk, are at room temperature—this helps the batter come together smoothly. Remember to spoon and level your flour to avoid compacting it, which can lead to a dense cake. Lastly, don't overmix the batter; mix until just combined to retain that light, fluffy texture.
Common pitfalls and how to avoid them
One common pitfall is forgetting to line your cake pans properly, which can result in sticking. Investing in quality nonstick baking spray can make a world of difference. Also, keep an eye on baking times; every oven is different! A toothpick should come out clean or with just a few moist crumbs when the cakes are done. If you run into any issues, check out helpful resources like King Arthur Baking for troubleshooting tips!
Serving suggestions for Andes Chocolate Mint Cake
Pairing Ideas for Coffee or Tea
The rich flavor of Andes Chocolate Mint Cake complements various beverages beautifully. Try pairing a slice with a warm cup of brewed black coffee or a smooth cold brew for an exquisite treat. Alternatively, opt for a refreshing green tea, which can accentuate the minty notes. If you're feeling adventurous, a chocolate chai latte offers a delightful balance of spices and sweetness, enhancing the cake's flavors. For a family-friendly option, serve it with a tall glass of milk—simple yet satisfying!
Creative Ways to Present the Cake
When it comes to presenting your Andes Chocolate Mint Cake, a little creativity goes a long way. Consider using a cake stand for elevation and visual appeal. Adorn the top with extra chopped Andes mints or delicate mint leaves for a pop of color. You could even drizzle some chocolate sauce over the top for added decadence. Serving individual slices on stylish plates can also elevate the experience; consider adding a sprig of mint or a scoop of vanilla ice cream alongside each slice for that ice cream parlor feel. The goal is to make every bite feel extra special!
Time details for Andes Chocolate Mint Cake
Preparation time
It takes about 1 hour to gather your ingredients and get everything prepped for baking. You’ll want to let your dairy ingredients come to room temperature and sift your dry ingredients for the best results.
Baking time
The baking process will require around 25 minutes. Make sure to keep an eye on your cakes, as every oven can be a little different! A toothpick inserted into the center should come out with just a few moist crumbs.
Total time
From start to finish, you’re looking at approximately 2 hours and 25 minutes. This includes the preparation, baking, and time needed for decorating the Andes Chocolate Mint Cake to perfection. It's well worth the wait for such a delightful dessert!
If you want to optimize your baking time, consider multitasking—perhaps prep your frosting while the cakes are baking. For more tips on making the perfect cake, you can check this guide on cake baking essentials. Enjoy your baking adventure!
Nutritional Information for Andes Chocolate Mint Cake
Understanding the nutritional profile of your favorite desserts can help you indulge mindfully. Here’s a quick overview of what’s packed into each slice of the Andes Chocolate Mint Cake:
Calories
Each serving contains approximately 556 calories, making it a delightful treat for special occasions.
Protein
This rich cake offers about 4 grams of protein per slice, providing a little boost alongside that indulgent flavor.
Sodium
With 415 mg of sodium in each serving, it’s wise to enjoy this cake in moderation, especially if you're watching your salt intake.
For more detailed nutritional insights, check out resources like the USDA FoodData Central or consult with a registered dietitian. Treat yourself mindfully, and enjoy every bite of this delicious cake!
FAQs about Andes Chocolate Mint Cake
What can I substitute for buttermilk in the recipe?
If you’re out of buttermilk, don’t worry! You can easily make your own by combining 1 cup of milk with 1 tablespoon of vinegar or lemon juice. Let it sit for about 5-10 minutes until it thickens slightly. This substitute will provide the tanginess required for the Andes Chocolate Mint Cake, ensuring it remains as moist and delicious as intended.
How can I enhance the mint flavor?
To take the mint flavor of your Andes Chocolate Mint Cake to the next level, consider adding more peppermint extract or incorporating finely chopped fresh mint leaves into the frosting. You could also sprinkle candy cane pieces on top for added crunch and mintiness. Just be cautious with the peppermint extract—start with a little more and taste, so it doesn’t overpower the chocolate.
Can I make this cake ahead of time?
Absolutely! Making your Andes Chocolate Mint Cake ahead of time is a great idea. You can bake the cake layers in advance and store them in the refrigerator for up to three days. Just wrap each layer tightly in plastic wrap to keep them fresh. Frosting can also be made ahead and stored in an airtight container in the fridge—just remember to re-whip it before spreading for that perfect fluffiness!
Conclusion on Andes Chocolate Mint Cake
The Andes Chocolate Mint Cake is not just a dessert; it’s an experience that brings the joy of mint chocolate chip ice cream straight to your plate. With its rich flavors and soft texture, this cake is perfect for celebrations or simply to indulge yourself. Enjoy every bite!

Andes Chocolate Mint Cake
Equipment
- oven
- mixing bowls
- cake pans
- mixer
- spatula
- measuring cups
- measuring spoons
- parchment paper
Ingredients
Chocolate Cake
- 2 ½ cups All-purpose flour
- 1 cup Dutch process cocoa powder
- 1 ¾ cups White granulated sugar
- 2 ½ teaspoon Baking powder
- 1 ½ teaspoon Baking soda
- 1 teaspoon Salt
- ¾ cup Oil (canola or vegetable)
- 2 teaspoon Pure vanilla extract
- 4 Large eggs (room temperature)
- 1 ¼ cups Buttermilk (room temperature)
- 1 cup Hot water
Chocolate Chip Mint Frosting
- 2 ½ cups Unsalted butter (slightly cold)
- 7 ½ cups Powdered sugar
- 1 teaspoon Peppermint extract
- 1 teaspoon Pure vanilla extract
- ½ teaspoon Salt
- ½ cup Heavy cream
- Food dye (blue, green, brown)
- 4 oz Semisweet chocolate bar (chopped small pieces) I used Lindt 70%.
- 2 packages Andes Mints 40 of the bars will be for the filling, the rest for decoration.
Instructions
Chocolate Cake
- Preheat the oven to 350°F. Spray three 8-inch cake pans with baking nonstick spray. Line the bottom of the pan with 8-inch parchment circles. Spray again.
- In a large mixing bowl, sift the flour and cocoa powder. Whisk in the sugar, baking powder, baking soda, and salt. Set aside.
- Start heating the water on the stove until steaming. In a separate bowl, mix oil, vanilla, buttermilk, and eggs together. Slowly whisk in the hot water.
- Pour the wet ingredients into the dry. Mix until just combined.
- Pour the cake batter evenly among the three cake pans. Bake for 24-27 minutes. Bake until a toothpick inserted comes out with moist crumbs or clean.
- Let the cakes sit in the hot pans for 10 minutes. Then, transfer to a cooling rack to cool completely.
Chocolate Chip Mint Frosting
- Let the butter sit on the counter for 30 minutes to get slightly cold. Sift the powdered sugar. Chop the chocolate into small pieces. Discard any dust from chopping the chocolate.
- Using a mixer, beat the butter on high for 3 minutes. It will be super fluffy. Slowly add in the powdered sugar. It will be very thick.
- Add in the mint extract, vanilla extract, salt, and heavy cream. Beat on low until combined. Then, beat on high for 2 minutes. Scrape the bowl halfway through. It should be very fluffy.
- Add in 2 drops of green and beat the frosting on high until combined. Add in one drop of blue and beat on high. Scrape the bowl and beat until it is all combined. To make the color not as brightly green, add a very very small drop of brown.
- Take off the mixer and use a rubber spatula to fold the chocolate chip bits into the frosting.
Assembly
- Place the cake layers in the freezer for 15 minutes to get cold. If the cakes have a dome, use a serrated knife to make the cakes even. While the cakes are in the freezer, chop 40 of the Andes mints. It will equal to 1 cup.
- Place a small amount of frosting on the board you are decorating on. This will lock the cake in place.
- Place the 1st layer of cake down. Use 1 cup of frosting and use an offset spatula to smooth it evenly on the cake. Place frosting in a piping and cut off the tip. Pipe a border around the edges of the cake. Sprinkle half of the chopped mints on top of the frosting.
- Place the second layer of cake down and repeat. Place the last layer of cake upside down (the bottom of the cake is facing up). This will give the flattest layer possible for the top of the cake.
- Frost the cake. If the cake is getting crumbs into the frosting, frost the cake in a light layer and freeze for 15 minutes. Then, frost the rest of the cake.
- To get the swirl look, use an offset spatula and a turntable. Lightly press on the cake with the spatula and spin it. The goal is to make it swirl and go up as you spin the cake.
- Top the cake with extra chopped Andes mints. *optional

Leave a Reply